Connect to an AWS EC2 instance using SSH
This section will explain how to connect to your EC2 instance using PuTTY (Windows users) or SSH (OS X/Linux users).
Prerequisites: EC2 instance with Ubuntu Linux installed.
Connecting to your EC2 Linux Instance from OSX/Linux:
Open a command-line shell, change directories to the location of the private key file that you created when you launched the instance.
Next you will need to change the permissions of the private key. You can do this by typing the following command:
sudo chmod 600 <name_private_key.pem>
Which can be for example:
sudo chmod 600 ClouderaCluster.pem
If your current directory is not where your private key is located, you need to type in the full path to your private key.
Now you can SSH into the machine by typing:
SSH ubuntu@<your-EC2-IP-address> -i <name_private_key.pem>
Which can be for example:
SSH ubuntu@52.36.64.79 -i ClouderaCluster.pem
If prompted "Are you sure that you want to continue?", enter "yes".
Reference:https://docs.aws.amazon.com/AWSEC2/latest/UserGuide/AccessingInstancesLinux.html
Connecting to your EC2 Linux Instance from Windows:
In order to connect from a Windows machine to your Linux EC2 instance via SSH, you need to install:
PuTTY: a free SSH client (https://www.ssh.com/ssh/putty/download)
PuTTYgen: a key generator tool for creating SSH keys for PuTTY (https://www.ssh.com/ssh/putty/windows/puttygen)
Download and install the two programs from the link above.
PuTTY does not natively support the private key format (.pem) generated by Amazon EC2. That is why you need PuTTYgen to convert your private key to the PuTTY format (.ppk).
Convert your private key
Open PuTTYgen and make sure thatRSAis selected underType of key to generate.

Click on Load and select the option to display files of all types.

Select the.pemfile for the key pair that you specified when you launched your instance, and then chooseOpen. ClickOK.
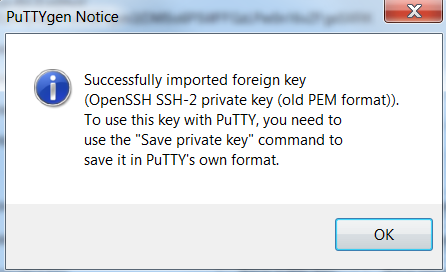
Choose Save private key to save the key in the format that PuTTY can use. PuTTYgen displays a warning about saving the key without a passphrase. Choose Yes.
Specify the same name for the key that you used for the key pair. PuTTY automatically adds the file extension.
Your private key is now in the correct format for use with PuTTY. You can now connect to your instance using PuTTY's SSH client.
Start PuTTY session
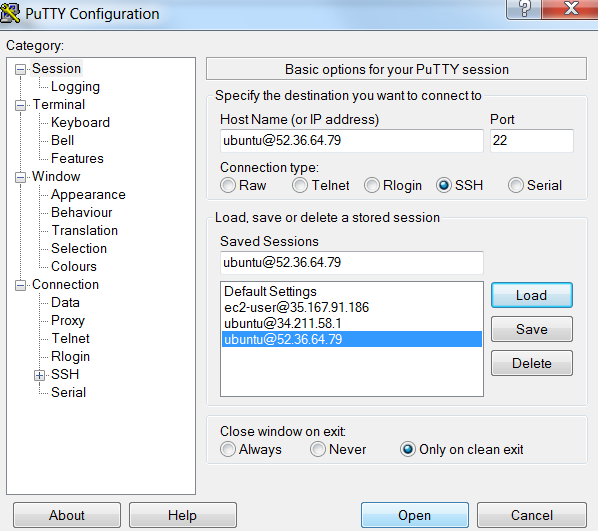
Open PuTTY and complete the Host Name field with the form:
ubuntu@<public_dns_name>
Which can be for example:
ubuntu@52.36.64.79
Make sure that Port is 22 and Connection type is SSH.
In the Category pane, expand Connection, expand SSH, and then choose Auth. Click on Browse, select the .ppk file that you generated from your key pair using PuTTYgen, and then choose Open.

Optionally, you can save the session information for future use. Choose Session in the Category tree, enter a name for the session in Saved Sessions, and then choose Save.
Once done, you can click on Open to start the PuTTY session.
If this is the first time you have connected to this instance, PuTTY displays a security alert dialog box that asks whether you trust the host you are connecting to. Choose Yes.
A window opens and you are now connected to your instance.
Reference:https://docs.aws.amazon.com/AWSEC2/latest/UserGuide/putty.html